The latest Sony Xperia models, namely the Xperia Z3+, Z4 Tablet, C4 and M4 Aqua, come with My Xperia Theft Protection. This program prevents you from installing a custom bootloader (ROM) on a stolen device and thereby bypassing Google account protection.
The MXTR utility is designed specifically to prevent the bootloader from being unlocked on Xperia devices. If My Xperia Theft Protection is activated, the user will not be able to perform this action, even if the device initially came with this feature by default.
The main difficulties occur when the bootloader is already unlocked on Xperia devices and the MXTP utility is activated. Since the unlocking has already taken place, the security system tries to prevent what has already happened. Because of this, the smartphone turns into a brick, beautiful and useless.

Sony developers have made a short description on their Unlock Bootloader page regarding the use of MXTP. In the article “Risks”, they advise not to activate MXTP before and after unlocking your devices.
Currently there are no custom ROMs for the Xperia Z3+, Xperia Z4 Tablet, Xperia C4 and Xperia M4 Aqua, so there is no need to unlock the bootloader on these models, and besides, Sony did not give permission to unlock them. However, that may all change once MXTP is fixed.
We can name many reasons for blocking access to a Sony phone. One of the main reasons is that you forgot the password you created. While it is unlikely that anyone would forget their password, it does happen quite often among users. The inability to bypass the screen lock is annoying as the phone becomes an important part of our lives. We will tell you how to unlock Sony password (Xperia) in 3 ways.
There are several ways to reset your screen lock. The available methods depend on the screen lock type and the version of Android your Xperia device is running. Some of the methods, such as those using Xperia My Service or Android Device Manager/Find My Device, require you to already have the service enabled on your device and have an internet connection enabled.
Read the table of contents to quickly find the information you need.
The note! Before you do any of the steps in this article, make sure you know your Google username and password. Depending on your security settings, your Xperia device may become locked after a reset or restore. Then you need to enter your Google account username and password to use the device. If you don't remember your Google username and password, you can't unlock the device yourself.
Advice. You can recover your Google account username and password using the Google account recovery page on . For Xperia X, Xperia L1, Xperia E5 and Xperia Z series (Android 5.1 or higher), you should know that when you receive a new Google username or password, you cannot use it to register and restore your device for 24 hours.
1. Click: Forgot your password?
2. To unlock your phone, you can answer the security question you set up when you set the screen lock. Or you can enter your Google account username and password. Click " Further».

3. Enter the answer to the question you selected or enter your Google account username and password. Click " Unblock».
4. You will be asked if you want to create a new screen unlock password. If you don't want to, click No.

If you haven't created a Google account or if you've forgotten the answer to your security question, you'll need to reinstall your phone software. This will delete any information stored on your phone. There's no way to recover the data that will be lost if you do this, but you won't be able to reset your screen lock without reinstalling the software. Read below on how to reset Sony.
Using the Xperia service to reset your screen lock
The note! Make sure you know your Google™ username and password. You may have to use them to use your Xperia™ device after the reset.
Using the Xperia service to reset your screen lock. All content on your Xperia device is retained after you reset your device's screen lock. The note! This method is not available on devices running Android 7.0 and above.
This reset method requires you to have previously enabled Xperia My Service on your Xperia device. Your Xperia device must also have an active internet connection (Wi-Fi® or mobile network).
How to reset your password using Xperia service
1. Turn off your phone.
2. To hard reset your phone, start by pressing and holding power buttons + buttonincrease the volume in within a few seconds.
3. The device will vibrate once. At this point, you can release the Power button. Continue holding the Volume key for another 10 seconds.
4. The phone will vibrate and then turn off, indicating that the hard reset procedure is complete.
Using Find My Device to Reset Sony Password
The note! Make sure you know your Google username and password. You may have to use them to use your Xperia™ device after the reset.
This reset method requires you to have previously enabled Android Device Manager on your Xperia™ device. Your Xperia™ device must also have an active internet connection (Wi-Fi® or mobile network). Selecting this method performs a full factory data reset. All content on your Xperia™ device will be deleted. In some cases, the content on the SD card may not be erased during a Find My Device reset.
If your SD card is not encrypted, you can remove it before performing the reset to prevent it from being erased. However, if you are using an Xperia™ device in a corporate environment, your IT department may have to force encryption on the SD card on your device. In this case, the contents of the SD card are erased or unreadable when you perform a reset, even if you remove the card beforehand.
How to Reset Sony Password Using Find My Device
1. If your SD card is not encrypted or not used in a corporate environment, remove it before performing a reset. Before removing the SD card, turn off your Xperia™ device. Turn on the device when you have removed the SD card.
2. On your computer or mobile browser, go to the website.
3. Sign in to the Google account you previously added to your device.
4. If you have multiple devices, select the device you have blocked at the top of the screen.
5. Select " Erase" Keep in mind that this action will permanently destroy all your data, such as your apps, photos, and music. Once you delete the contents of your device, Find My Device will no longer work on your device.
6. After remotely erasing the contents of your device, you can set up your device again with your Google account and a new screen lock.
Recovery software to reset your Xperia device
The note! Make sure you know your Google username and password. You may need to use them to use your Xperia™ device after recovery.
You can reset your screen lock using a USB cable, your computer, and the software recovery feature in the Xperia™ Companion app.
The note! The software recovery feature replaces the software on your device. All personal data stored on your device will be lost. Content on the external SD card is not deleted. Xperia™ devices must have a minimum charge level of 80% before you can perform a software restore.
Steps:
1. Computer: if it is not already installed, download and install the Xperia Companion app from .
2. Open the Xperia Companion app.
3. In the section " Xperia Management" click " Software recovery».
4. Follow the on-screen instructions, but do not connect your Xperia device to your computer until you are told the five-step instructions in the Xperia Companion window.

In this instruction, I would like to tell you how to unlock the bootloader on a Sony Xperia without losing data on your smartphone. What is a bootloader (aka bootloader), why is it closed by default, why is it opened, and what are the consequences of this? You can easily find it on the Internet, and we mentioned this in our first one. The method proposed below seems to me to be simpler; it will allow you to save data on the device, and in the future you can safely close the bootloader. Naturally, we are not responsible for any actions - it lies entirely with you.
- All you need to have: a working smartphone, an Internet connection, the latest (at the time of writing) version of FlashTool 0.9.19.10, which you can . Be sure to install the drivers, which you can download there (or after installation, in the program folder, find the drivers folder and the Flashtool-drivers.exe file in it).
- Turn off your smartphone and run FlashTool as an administrator.
- Press the volume down (down) button on the turned off smartphone and connect the smartphone via USB - the program will detect it.
- Now the important point is that in order for the data to be saved, we need to create a folder and place a text file in it. If you have already opened the bootloader before, then you should have the folder, but if this is your first time, then follow the next steps.
- Let's go to the folder with the FlashTool (using the example of where I personally have it) C:\FlashTool\registeredDevices (in older versions of the program the path for the desired folder will be C:\Flashtool\custom\mydevices\). If suddenly you don’t have a folder in this path (for example, registeredDevices or in previous versions of mydevices), then create them.
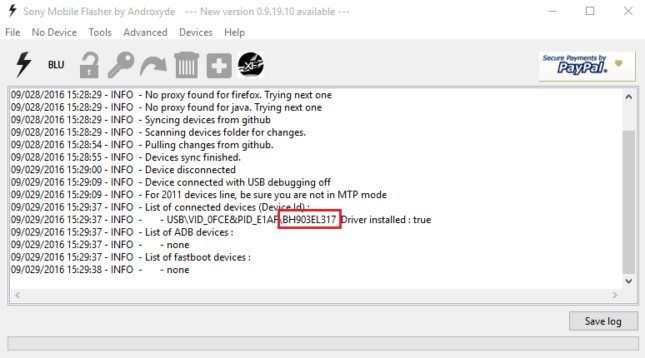
- Previously, we have already connected the smartphone to the computer, select the Devices – Check Drivers tab.
- The program window will display a list of currently connected devices. We need to take the serial number of our smartphone (I have it BH903EL317), go to the folder created in step 5 and create a new folder in it and name it with this serial number.

- In a new folder, create a text document and call it ulcode.

- Go to the Developer Sony Mobile website - link. Below, select your smartphone model, in the next window, enter the email address to which you will receive a letter with a link. We follow it and get to a page where you need to enter the IMEI of your smartphone. Confirm its entry and receive a notification with confirmation and your special unlock code.
- We need to paste this code into the text file we created earlier.
- Press the BLU button in the FlashTool program, connect the smartphone in fastboot mode by holding down the volume up button.
- The “Bootloader unlock wizard” window will appear in front of you with the IMEI of your device and the previously received unlock code. Press the Unlock button, wait for the procedure to complete, close the window and turn on the smartphone. If it turns on, then everything is fine. 🙂 You can check the success of the procedure like this: in the dialer, enter *#*#7378423#*#*, select Service info – Configuration and there we look for the line Bootloader unlocked: Yes.
How to lock the bootloader back onSonyXperia
Everything is simple here: launch FlashTool, connect the switched off smartphone to the PC with the volume down button pressed, press the BLU button, reconnect the smartphone in fastboot mode and in the same “Bootloader unlock wizard” window that appears, we will already see the Relock button. We press it, wait for the process to complete, close the window and turn on the smartphone - the bootloader on your Sony Xperia is blocked again. We check in the same way: dial the code *#*#7378423#*#* in the dialer, go to Service info – Configuration and there we see the line Bootloader unlock allowed: Yes.
These instructions are written based on materials from other users from the 4pda forum.
In contact with
I forgot the pattern pattern on my Sony Xperia phone and I don’t know what to do - about 15,000 people a month come knocking on the Internet with this question.
Usually the unlocking problem comes down to one thing - there is no one universal recipe for unlocking Sony xperia or Ericsson phones, since there are a lot of models.
For example, Sony Xperia z3, z1 compact, st23i, Sony m2, m5, c5303, m2 d2303, e1, c3, Sony Ericsson, Xperia mini, Sony Aqua, zr, Sony c1905, c2005, 1905, Sony lt25i, c2105, 6603, z2 d6503, m4, xperia e5, sony xperia e4 and so on.
Therefore, I will present three methods here at once. In most cases all three will do, but on some models only one is possible.
NOTE: you can remove the graphic key, with the loss of personal data, with saving and restoration.
The option with data loss can be said to be the most common, besides, if you are faced with the question of what is more important: the Sony Xperia phone or the data, then I am sure that you will choose the phone, because you will not have access to the data without unlocking the pattern key.
ATTENTION: everything described below applies to Sony phones running Android.

All other devices, like the old Ericsson ones, are not acceptable without an operating system, however, they don’t even have a graphic key.
The first way to unlock a pattern key in a Sony phone if you forgot it - without data loss
After you read this section, go, there is a link to go to a special Google service (later I will move it here - I don’t want to be distracted now).
However, there is a lot of useful information with pictures about removing the pattern on Android.
For the method described here you need: to have an Internet connection to your phone and remember your Gmail login password.
If there is no Internet, the problem can be easily resolved - even when it is blocked with a graphic key (in most cases, the Internet is already available and nothing needs to be done).
If you don't remember your Gmail login details, they are also restored. By the way, I started off on the wrong foot, the method in the link above is applicable to unlocking via a computer, but if you haven’t forgotten your credentials, then you can remove the pattern lock directly from a Sony Xperia phone or another phone from this manufacturer.
To do this, type the wrong pattern key 5 times. Next you will see something like this button “Lost model?” Smatphone press the “Home” button or forgot... after clicking on “Home” (it is possible that you will receive a slightly different message).
Now you will need to enter your email address and password. Then click “Login”, after which you can change the pattern, and then disable it altogether if you wish.
The second way to bypass the pattern lock in a Sony phone while saving your data
In Sony Xperia, it is easy to bypass removing the pattern using a code. To do this, the first step is to select an emergency call.
Then we dial the code - *#*#7378423#*#* (works on all Sony Xperia) - after this a service menu will appear, in which select Service tests.
Then we find/select NFC -> NFC Diag Test, wait until the test is finished and click on the “Home” button
Now you should find yourself on the desktop of your Sony phone. There is no point in describing what to do next.
NOTE: on some Sony Xperia Z, if the above code may not work, then try another one - *#*#73556673#*#*, after which the phone will reboot.
Exceptions are common in our lives and are possible here too. Therefore, if the method did not turn out to be effective, we move on.
The third method to unlock the Sony Xperia graphic key with data sweating
Sony Xperia, like any electronic device equipped with software, we are not immune from failure, one of which is that we forgot the pattern key.
Fortunately, Android comes with a recovery menu where we can restore the phone to its original state.
This is a very simple process, although some may find it scary - don’t be afraid, don’t let the black screen with text scare you, I’ve used it at least dozens of times and all have been successful.
It goes without saying that all the data stored on your phone will be lost once the process is completed. To begin, you must completely turn off the device.
To start, hold down the button combination. In most cases these are the buttons: on / off + Volume up or top down.


Now you are ready to reboot your Sony phone and, after a few settings, start using it as if nothing had happened.
Therefore, select and press (with the power button) on the line - Reboot system now.

Finally, a quick summary is a step-by-step way to make it all even clearer.
- Turn off the device completely
- Get to the recovery menu
- Select the option “Wipe data / Factory reset” (use the volume buttons and select the on / off button)
- Select the “Yes” option (as we did before)
- Select "Reboot Now"
- Ready
As you can see, this is a very simple process that may seem labor-intensive only at first glance
Just a few steps and your Sony Xperia phone is “ready for battle” again. Good luck.
With this article we begin a series of materials devoted to various services for finding lost smartphones. Today we will talk about the Sony My Xperia service, which helped me return my stolen smartphone.
Almost every major electronics manufacturer today has an application designed to protect the device from loss. Basically, the functions of all such services come down to finding the location of a lost smartphone and remotely blocking the device.
My Sony Z Ultra, not without the permission of the owner, was “stolen”, and the attacker disappeared in an unknown direction. Therefore, I was forced to use the My Xperia service.
The service has close integration with Google services. Everything is tied to the Gmail account and various accesses to the user's data. For the owner of an Android device, there is no need to register anywhere else.
My Xperia service was already enabled on my smartphone. The service is activated automatically and is accompanied by detailed instructions from the application. In addition, each action of the service is followed by sending an information letter by e-mail.
Of course, the device must be configured to connect to the Internet via mobile data or Wi-Fi, otherwise the utility will not work. Data obtained only from cell towers or GPS satellites is by no means sufficient. Therefore, if a smartphone thief has blocked access to data transfer, the My Xperia service can only wait until the next time the device has access to the network.
You can find your smartphone through any desktop browser or from a mobile device. To do this, you need to go to the link myxperia.sonymobile.com and log in through your Gmail account. I've used Safari on my desktop and iPad mini.
After correct authorization, the Sony Z Ultra was found and shown on Google maps. A short search, taking into account the errors of the maps, led me to a cafe where the thief was calmly using my smartphone. I do not recommend making independent attempts to apprehend the villain, as this is fraught with various consequences. In addition, a person who even finds a phone on the street is obliged to return it. Otherwise, his act falls under a well-known criminal article.

Data about the location of the device is already enough to file a complaint with law enforcement agencies. Despite some skepticism that exists in relation to the actions of the police, the search for the device and the thief, if it is stolen, can be successful. It is important to remember two main rules: do not waste a minute and immediately contact the police and insist on your point. In any case, it's better than sitting idly by.
You can take independent measures to return the stolen item and put pressure on the villain’s conscience. First of all, send a warning signal. In this case, a corresponding notification is displayed on the smartphone screen, accompanied by a sound and vibration signal for 60 seconds. Quite a funny feature, since the person who finds someone else’s phone already knows that they have found it.

Next, I tried to block the device. The Sony Z Ultra locked itself almost instantly and prompted me to enter a four-digit password. This protection is similar to setting a password from the menu. In addition, when blocked, you can send a message asking for the return of the lost device.

It happens that the value of the content on the device is several times higher than the cost of the device itself. My Xperia allows you to perform a factory reset. Again, the function is similar to deleting all data, which is available in the settings. All contacts, accounts, photos and profiles have been deleted from the mobile device, with the exception of installed applications.