Have you purchased a new, fast solid state drive (SSD) and your old one is sitting around? Give it a new task and use it as an external data storage device. To do this, you only need a case with a SATA controller; it is available for both 2.5-inch and 3.5-inch models. The latter require a power supply, while compact drives have enough power supply via a USB port.
Labor intensity: average, costs: 600 rubles.
Mini NAS on the router
 Do you need access to the same data across your entire home network? To do this, you don't need expensive and bulky network attached storage (NAS) - a USB drive can do this task if it's connected to your router. Newer devices are equipped with a corresponding port.
First you need to format the USB drive from Windows OS in the NTFS file system and then simply connect it to the router. Moreover, the latter must have a USB port and support the corresponding functionality. Now, typing 192.168.1.1 (or similar) into your browser's address bar will take you to the router's user interface.
Go to the USB Settings | Sharing a storage device" (for TP-Link routers; for other devices the names of menu items may differ) and make sure that the disk starts.
To access data on your home network, you will only need to type an address like “\\192.168.1.1\Volume1” in Windows Explorer. A permanent connection is achieved by right-clicking on the folder to which you plan to allow access and selecting “Map network drive.”
Labor intensity: low, costs: no
Flash drive instead of password
 A small USB flash drive also has practical applications. For example, when you log into Windows, you can unlock your computer without entering a password. To do this, you will need the Rohos Logon Key tool (1450 rubles), Predator (650 rubles) or the free USBLogon (http://www.rohos.ru/products/rohos-logon-free/).
 After installation, you need to select the connected USB drive and configure security settings. After entering the Windows password, the flash drive is ready for use. Unfortunately, working with USBLogon is complicated by the German-language interface, but even without knowledge of German it is easy to understand.
Labor intensity: average, costs: no
Flash drive for emergencies
 When your computer no longer works the way it should, a bootable USB flash drive comes to the rescue. The Sardu tool (http://www.sarducd.it/) installs up to 20 different antivirus programs on the drive, and also provides various versions of Linux and other “first aid” software.
> Preparation: in the left sidebar the selected software is listed by category. Check the boxes next to the required programs. We recommend choosing several antiviruses and a version of Linux (for example, Ubuntu).
> Creating a flash drive: On the right sidebar, click on the USB drive symbol. You can start creating a bootable USB flash drive.
> Emergency use: To use a bootable flash drive in the event of an “accident”, you need to change the boot sequence from drives in BIOS Setup.
 In this case, you should set the boot priority from USB to HDD. Then select the required program from the list. Don't forget to undo changes to the BIOS after "repairing" your computer.
Photo: manufacturing companies, racum/Flickr.com
Unfortunately, there are often problems with a computer system that are not easy to solve. Someone needs to reinstall the OS or restore the PC sooner or later. It is not always possible to access the hard drive to roll back the system or install a new one. That's why experts use a flash drive.
It is much more convenient to use than carrying around a heavy hard drive. But to do this you will have to learn how to do it. Many people think that it is difficult to do this. But if you follow the instructions, everything will be much simpler. For everything to work out, you need to get a flash drive or memory card.
Preparation
Before you make a flash drive into a hard drive, you need to prepare everything for this process. First, it's worth understanding multipartition. As practice shows, it will have to be abandoned, since flash media cannot handle other partitions, but only work with the first block.
Next, you need to check whether Windows works with a flash drive. Afterwards you will have to configure the drive to be recognized as a non-removable device. A flash drive is almost always displayed as a removable drive, and the system should “think” that a hard drive is installed.
Before you make a flash drive into a hard drive, you need to understand that if you do something wrong, you can damage the device. If the setting is incorrect, the drive will not be able to change its connection parameter. Experts suggest using a special driver.
First stage
Is it possible to turn a flash drive into a hard drive? It is possible, and it will be easy to do, it is only important to follow the instructions. After connecting the flash drive, you will need to determine its type. This can be done in two ways: using two commands or a special menu.
To do this, you need to open the drive management manager. Using the Win + R combination, you can launch the Run menu. You will have to enter the command diskmgmt.msc in the search bar. The drive information appears.

You can also use In a new window you will need to enter the following command - list volume. To identify a flash drive in the list, just look at the storage capacity. You can also view the media type in properties. Just go to the Volumes tab.
Second phase
How to make a flash drive a hard drive? After determining the drive type, you will need to either change the connection or continue working with it. If the flash drive is still detected as a removable device, you need to install a filter driver. To do this, you can use the Hitachi Microdrive utility. Thanks to it, you can not “physically” change the properties of a flash drive, but “deceive” the system by passing off the drive as a hard drive. Next, you can make the flash drive a hard drive. The system will allow you to divide the archive into several blocks, which will have to work simultaneously. It will be enough to install the necessary software.
Third stage
Next you will need to find the carrier number. Go to “My Computer”, find the connected flash drive and right-click. Having selected “Properties”, go to “Details” and in “Properties” select “Path to device instance”. The device number will appear below. In this line you need to copy the characters after the second slash. The numbers will be needed for the Hitachi Microdrive program. Next, you will need to find out the bit capacity of the system in order to understand the drive settings.

To do this, just go to “My Computer”, right-click on the free area and select “Properties”. A new dialog box will display information about the system and its bit capacity. After this you can configure the program.
Setting up the Hitachi Microdrive utility
If your computer runs at 64 bit, you will have to go to the program folder. In it, find the cfadisk document, find the chapter cfadisk_device and cfadisk_device.NTamd64. After the slash you will need to paste the copied equipment number. If the computer is running on 32 bits, you must use the cfadisk_device chapter. Find the line DISK&VEN_&PROD_USB_DISK_2.0&REV_P and insert the media number instead.
Fourth stage
The last step is replacing the drivers. If you have a 64-bit OS installed, you will need to configure one more setting. For correct operation and installation of drivers, you will have to disable digital signature verification, otherwise the system will suspect fraud. In addition, it can update itself, which, naturally, is undesirable for the process.

Now you can start the installation. Open the “Drivers” tab and select “Download drivers”. Here you need to specify the path to the folder with the utility driver. The system will detect that the digital signature is disabled, and then ask you to restart the PC. After a reboot, the flash drive will work as a non-removable drive.
Working with a hard drive
It is also possible to try to figure out how to make a bootable USB flash drive from a hard drive. Here it is enough to configure the hard drive to work with the OS. Through the “Control Panel” you need to go to “Administration” and “Computer Management”. In the left column we find “Disk Management”. All information about the hard drive partitions will appear in the table on the right. Now you need to format the hard drive and delete all partitions. After this, you will have to partition the disk and create a new volume. It will be enough to designate it as active and write the operating system there.
Alternative
Thinking about how to make a flash drive an external hard drive also leads the user to the Lexar Bootlt utility. It is not often talked about, although it is very simple and effective for this task.
The utility is free and helps to convert a flash drive into a fixed device. By the way, thanks to the same program you can return the drive to a removable type. The software is designed for Lexar devices, but easily copes with other flash drives. Also works with Windows starting from XP.

But there are still some nuances associated with this program. The utility works with branded devices, but sometimes fails with other drives. May fail when connecting via USB 3.0 interface. And it is important to remember that after flashing any device, the warranty is lost.
After installing Lexar Bootlt, you need to run the program as an administrator, select a flash drive in the list, and then click on the Flip Removable Bit command. Next you need to save the change and restart the PC.
Working with a laptop
Is it possible to turn a laptop hard drive into a flash drive? As practice shows, laptops do not last forever, so many users simply abandon the device or simply sell it. But you can benefit from it by turning the hard drive into a drive. Usually it is enough to purchase a special box in which to place the hard drive.
This option is suitable for hard drives that were installed in older models. For example, you can use a hard drive with a capacity of 4 to 100 GB. Larger devices may not work over the rather slow USB interface. A box like this costs about 10-20 dollars. It comes with the necessary cord to connect the drive to a PC. To install the hard drive, there are screws that will securely secure the hard drive in the case.

Working with a hard drive and flash drive is not easy. You must be careful not to damage the drive. You should also follow the driver installation instructions and use the commands carefully.
Experts advise immediately figuring out how to remove program drivers. In our case we are talking about Hitachi Microdrive. To do this, you need to open the properties of the hard drive and select driver update. This process will automatically get rid of third-party installations and load the native driver.
Changing the settings of a flash drive will void the user's warranty, so it is better not to experiment with a newly purchased device. In addition, if you make a mistake in the settings, you can lose your drive.
Windows users with a standard set of knowledge about the capabilities of the operating system are unlikely to encounter the need to divide the memory of a USB drive into two halves. However, such an operation may be necessary if certain versions of Windows are recorded on a flash card with the possibility of subsequent installation or reinstallation of the system.
The USB drive itself has almost completely replaced CDs due to the following reasons:

In general, splitting a flash drive into two parts will be needed for many purposes. The end result of such an operation is that the flash card is recognized by the computer as one of the hard drives. Fortunately, you don’t need any special knowledge to do this: just learn about the following methods.
How to turn a flash drive into a hard drive?

At the moment, the following options for dividing a flash drive into two parts are known:
- the use of special programs or so-called utilities. You should look for them on the website of the brand that owns the specific USB drive model. Downloading from third-party resources can be not only unsafe, but also pointless;
- replacing drivers. In this case, the digital signature of the initially installed flash drive driver is checked. As a result, the user must save the driver without this signature;
- installing the Hitachi Microdrive driver. Drivers for cards from this manufacturer will help you split drives of almost any other brand into two parts.
All of these are quite simple and, moreover, free methods that are worth considering in more detail.
Using Utilities
Using such a program, you can not only turn the drive into a hard drive, but also achieve the opposite effect. The most famous utility of this kind is Lexar Bootit.

With its help, it is possible to store the most common OS - Windows, regardless of the latest version.
How to install Lexar Bootit utility?
- Download the archive with the program from the official website of the brand. It is worth paying attention to the fact that the mentioned site contains versions for both MacBooks and personal computers.

- Run the program. A prerequisite is to run as an administrator.


- Next, the user will be presented with a selection of portable devices. Accordingly, you should choose the flash drive that you plan to share.

- Click on the “Flip Removable Bit” button.

- Confirm completed actions.

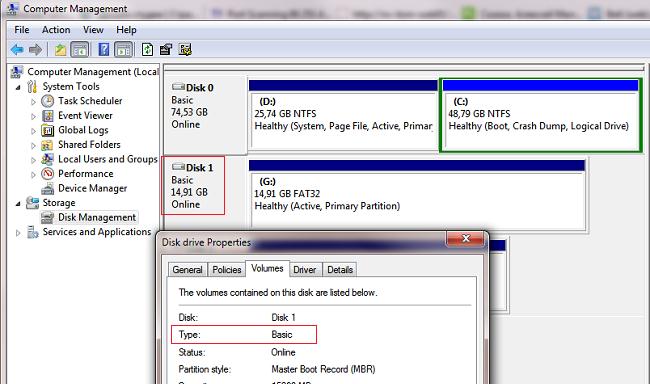
- Remove the flash drive using Safe Eject, and then plug it in again. In the “Volumes” tab, “Basic” should be indicated opposite the “Type” characteristic.

In case of problems with the operation of the utility, it is recommended to restart Windows. As a rule, in this case, the “transformation” of the card into a disk occurs within a few minutes.
Replacing drivers
This operation is considered more complex, but in case of inaccuracies with the previous method, it can become a worthy replacement.
How to install a third-party driver instead of the standard version of the flash drive itself?
- Find the required flash drive in the “My Computer” tab.

- Right-click to open the menu and select the “Properties” line.


- In the fourth tab “Drivers”, select the “Update Driver” button.

- In the next window, select the location of the utility.

- Next, select the pre-downloaded driver and confirm with the “Next” button.
- After this, a warning window will appear in front of the user. The system will notify you that the driver does not have a digital signature. Among the two options offered, you should select “Install this driver software anyway”.

This completes the installation process. Be sure to restart the computer itself and reconnect the flash card.
Installing the Hitachi Microdrive driver
In this case we are talking about the so-called filter driver. This method is considered one of the most reliable and, importantly, safe.
How to install Hitachi Motodrive filter driver?
- Determine the type of your operating system - 32-bit or 64-bit. To do this, you need to open the “Control Panel”, and then the “System” tab. The bit capacity of your computer will be indicated there.


- Download the Hitachi Microdrive driver depending on the information received. Accordingly, downloading should be done from the official website of the mentioned brand.

- On the flash drive icon in “My Computer”, go to the “Properties” menu using the right mouse button.
- Open the “Equipment” tab, click on the “Properties” button.
- In the very last tab “Details”, click on the button and select “Device Instance Path” from the list. Next, copy the code to the clipboard.


- Next, open the downloaded driver. You can use any type of text editor to open it.


Important! For a 64-bit system, open the “cfadisk” file.
- The user is presented with two lines, each of which contains the word “Disk”. The data after this word should be replaced with the code you just copied.

- After the manipulations have been performed, the file must be saved.

- Go to the “Drivers” tab, select the “Update Driver” button, then follow the instructions described in the “Replacing Drivers” section.
As in previous cases, the computer restarts.
Video - Convert micro SD into HDD hard drive Windows 10
Initially I thought of writing instructions, but in fact it turned out that it was a review of the use of the device. I did not correct it, because I think this option will also be useful to our dear readers.
How to make a homemade external HDD from a hard drive
Some time ago I got a 500GB laptop hard drive. But due to the lack of my own laptop, there was nowhere to install it, and just throwing such a volume “until better times” was a toad. And since the hard drive from a laptop is a box a little more than 5 centimeters wide and ~6-7 mm thick, a strong-willed decision was made, spending a minimum amount of money and time, to turn this drive into a kind of flash drive with a capacity of 500GB, putting it in special device called " External HDD pocket«.
To solve this problem, a pocket for a 2.5″ HDD was ordered from the online store SunBright (ME-945Q-TI) from a little-known Taiwanese company Welland priced at just 15 evergreen dollars.
Here are its characteristics:
- Supported HDD types: 2.5″ SATA I/II HDD
- Connecting to a computer: USB 2.0 at speeds up to 480 Mbps
- System requirements: Windows 2000/XP/Vista/7 or MAC OS 9.0 or higher
- One Touch Backup: For Windows in USB mode
- Power supply: via USB cable
- Size: 129 x 77 x 12 mm (L x W x H)
- Material of manufacture: Aluminum
For a little thing that costs “three kopecks” you don’t need more.
In this article we will show you how to make sure that USBflash drive or SDthe card was detected in the Windows system like a regular local hard drive. You might ask, why is this necessary? The fact is that Windows by default defines USB flash drives and memory cards as removable drives, which cannot be divided into several partitions using Windows standards. And even if you split the flash drive into two or more partitions using third-party utilities (in the same Linux), then only the first of them will be available in the Windows OS (by the way, built-in appeared in Windows 10 1703). Those. Windows supports normal operation with multi-partitions only for HDD drives, which are defined in the system as local (i.e. non-removable).
RMB bit and USB media
Windows operating systems recognize USB flash drives as removable/removable devices due to the presence of a special bit descriptor on each device R.M.B.(removablemediabit) . If, when polling a connected device through the StorageDeviceProperty function, the system determines that RMB=1, it concludes that the connected device is a removable drive. Thus, in order to convert a USB flash drive into a hard drive from the system's point of view, it is enough to modify this descriptor. This can be done directly (which is quite risky due to differences in hardware implementations of specific devices, and is not always possible), or indirectly, by replacing the response of a USB device using a special driver that allows you to filter information in the device response.
Advice. Some manufacturers produce special utilities for flashing the controller of their flash drives. First of all, try to find such a utility and/or firmware on the manufacturer’s website. This is the most correct way. If you don’t find such a utility, follow the recommendations from this article.
Connect a USB flash drive to any free port on your computer, then open Disk Management Manager ( diskmgmt.msc) and make sure that its type is defined in the system as Removable(Removable device) .
You can also see the device type on the Volumes tab in the disk properties (as we see here Type: Removable). 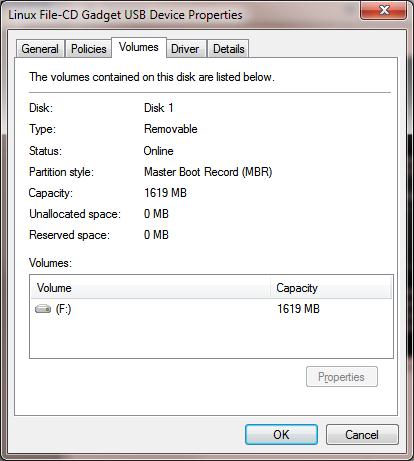
Or using the diskpart command:
List volume

In this article we will look at two ways to change the RMB bit on a USB flash drive - by using the Hitachi filter driver (changes are made only at the driver level on a specific computer) and changing the bit in the controller firmware using the BootIt utility from Lexar (a more universal method, but there is a number of restrictions and is not applicable to all models of flash drives and SD cards). Although both of these methods are quite old and I originally tested them on Windows 7, they continue to be relevant and work equally well in modern Windows 10.
Lexar BootIt utility
Recently I came across a rather interesting utility - LexarBootIt. This is a free, portable program that can change the RMB of a removable drive to make a removable USB device fixed (or vice versa). Even though the Lexar BootIt utility is designed for Lexar devices (Micron, Crucial), it can also work with flash drives from other manufacturers. The BootIt utility supports all versions of Windows, from Windows XP to Windows 10.
Important. The utility is guaranteed to work for Lexar drives. Judging by the reviews, the “Flip removable bit” function does not work on fast USB 3.0 flash drives. In addition, when flashing the controller, you will lose the warranty on the flash drive and can make it inoperable.
You can download BootIt on the Lexar website (lexar_usb_tool) or from our website ().
- Run BootIt.exe with administrator rights
- Select your flash drive from the list of devices
- Click on the button Flip Removable Bit
- Save your changes by clicking OK.

Reconnect the device and use Device Manager to make sure that its type has changed from Removable to Basic.

If the BootIt utility did not help change the RMB bit on a removable drive, try using the following method, based on the Hitachi Microdrive filter driver
Filter driver for Hitachi Microdrive flash drives
In order for a USB flash drive or SD card to be recognized in the system as a hard drive, we need a special filter driver that allows us to modify the data transmitted through the system stack of the current device driver. We will use a filter driver for USB flash drives from Hitachi ( Hitachi Microdrive driver), which at the OS driver level allows you to change the type of flash drive device from removable to fixed (USB-ZIP -> USB-HDD). Thanks to the use of this driver, you can hide from the system that the connected device is removable. As a result, the system will consider that it is working with a regular hard drive, which can be divided into partitions that will be simultaneously accessible in the system.
Archives with Hitachi Microdrive driver:
- 32 bit systems - (3.0 KB)
- Hitachi Microdrive version for 64 bit systems - (3.8 KB)
You need to download the driver version for your system according to its bit capacity. Both archives have the same structure and consist of two files:
- cfadisk.inf– installation file with driver settings
- cfadisk.sys- Hitachi driver file
The next stage is identifying the device code of our flash drive. To do this, in the disk properties on the tab Details in the parameter Device Instance Path select and copy ( Ctrl+C) device instance code. 
In our example it would be:
USBSTOR\Disk&Ven_Linux&Prod_File-CD_Gadget&Rev_0000\0123456789ABCDEF&0
Let's say we plan to install the driver on 64 bit system. Using any test editor, open the file for editing cfadisk.inf. We are interested in the cfadisk_device and cfadisk_device.NTamd64 sections.
%Microdrive_devdesc% = cfadisk_install,IDE\DiskTS64GCF400______________________________20101008 %Microdrive_devdesc% = cfadisk_install,IDE\DiskTS64GCF400______________________________20101008
We change the value DiskTS64GCF400______________________________20101008 to the code of our device.
Important! In the device instance code, it is necessary to discard the part after the second “\” (in our example we discard 0123456789ABCDEF&0).
We get:
%Microdrive_devdesc% = cfadisk_install,IDE\USBSTOR\Disk&Ven_Linux&Prod_File-CD_Gadget&Rev_0000 %Microdrive_devdesc% = cfadisk_install,IDE\USBSTOR\Disk&Ven_Linux&Prod_File-CD_Gadget&Rev_0000
Save the file.
If the driver is installed on a 32 bit system, you need to download the recommended archive, unpack it and open the cfadisk.inf file for editing. Let's find a section :
%Microdrive_devdesc% = cfadisk_install,USBSTOR\Disk&Ven_LEXAR&Prod_JD_LIGHTNING_II&Rev_1100 %Microdrive_devdesc% = cfadisk_install,USBSTOR\Disk&Ven_JetFlash&Prod_TS1GJF110&Rev_0.00 %Microdrive_devdesc% = cfadisk_install,USBSTOR\DI SK&VEN_&PROD_USB_DISK_2.0&REV_P
Then we change the data in the last line, indicating the code of the instance of our flash drive, i.e. in our example we get:
%Microdrive_devdesc% = cfadisk_install,USBSTOR\Disk&Ven_LEXAR&Prod_JD_LIGHTNING_II&Rev_1100 %Microdrive_devdesc% = cfadisk_install,USBSTOR\Disk&Ven_JetFlash&Prod_TS1GJF110&Rev_0.00 %Microdrive_devdesc% = cfadisk_install,USBSTOR\Di sk&Ven_Linux&Prod_File-CD_Gadget&Rev_0000

Advice. If you want the USB flash drive to appear with a specific name in the device manager, you need to edit the value of the Microdrive_devdesc variable, for example like this:
Microdrive_devdesc = "Transcend 64GB DIY SSD"
Installing the Hitachi Microdrive driver instead of the native USB drive driver
All that remains is to replace the driver used by the USB flash drive.
Important! If the Hitachi Microdrive USB driver is installed on a 64-bit system, then... There is no digital signature for this driver, you will have to either.
Open the Drivers tab and click the button Update Drivers. 
Let's indicate the folder to the directory into which the downloaded archive with the Hitachi driver is unpacked: 
Let's select a new driver. 
We ignore the warning about the missing driver digital signature. 
Advice. In Windows 10 and Windows 8, when installing the driver, the following error appears:
Windows found drivers for this device, but an error occurred when trying to install the drivers.
Hitachi Microdrive
Third party inf does not contain signature information

To disable driver digital signature verification, run the following commands:
bcdedit.exe /set nointegritychecks ON
bcdedit.exe /set TESTSIGNING ON
Restart your computer and try to install the driver again.
All that remains is to restart the computer and, by opening the disk manager, make sure that your flash drive is now recognized as a regular hard drive ( Type: Basic), and the Hitachi driver is used as the driver.
By opening Explorer, you can also make sure that the icon of the flash drive has changed; it is now displayed as a hard drive, a regular drive. 
Now you can work with this flash drive like a regular HDD: create partitions, specify the active partition, create dynamic disks, install software that does not work from flash drives, etc.
Important. On other Windows computers without this driver, the second partition of the device will not be available.
To remove the Hitachi Microdrive driver, open the disk properties and on the Driver tab, click the Update Driver button - the system will install the native driver itself.

Advice. If after installing the Hitachi driver the system stops booting with BSOD, you need to boot the computer from the Windows installation disk / Live CD and manually delete the following files:
- cfadisk.sys in the %windir%\System32\drivers directory
- Directory "cfadisk.inf_amd64_..." from %windir%\System32\DriverStore\FileRepositoty
Restart your computer
You need to understand that this solution will only work on the system on which the appropriate driver is installed.